HTML 수업에서 가장 어려워하는 시멘틱 태그를 설명하는 자료 만들기

공대언니
2026.05.19
소개
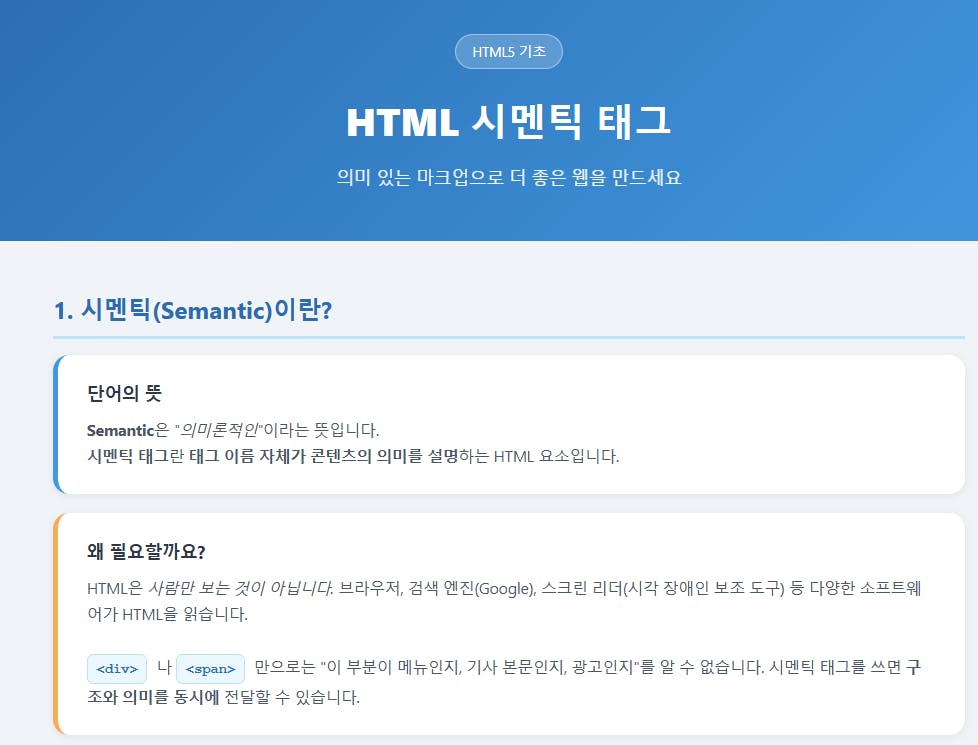
학생들이 CSS를 어려워하는데 그 중에서도 시멘틱 태그에 대해서 이해하는 것을 어려워해서 강의 자료를 만들어 보았습니다.
진행 방법
어떤 도구를 사용했고, 어떻게 활용하셨나요?
claude code를 사용해서 개발을 했습니다.
Tip: 사용한 프롬프트 전문을 꼭 포함하고, 내용을 짧게 소개해 주세요.
HTML 단일 파일로 만들어 달라고 했고, 시멘틱 태그에 대해서 설명하는 웹 페이지를 만들어 달라고 했습니다.
Tip: 활용 이미지나 캡처 화면을 꼭 남겨주세요.
Tip: 코드 전문은 코드블록에 감싸서 작성해주세요. ( / 을 눌러 '코드 블록'을 선택)
<!DOCTYPE html>
<html lang="ko">
<head>
<meta charset="UTF-8" />
<meta name="viewport" content="width=device-width, initial-scale=1.0" />
<title>HTML 시멘틱 태그 완전 정복</title>
<style>
* { box-sizing: border-box; margin: 0; padding: 0; }
body {
font-family: 'Segoe UI', 'Malgun Gothic', sans-serif;
background: #f0f4f8;
color: #1a202c;
line-height: 1.7;
}
/* ── 페이지 전체 레이아웃 ── */
.page-wrapper {
max-width: 960px;
margin: 0 auto;
padding: 0 1.5rem 4rem;
}
/* ── 히어로 ── */
.hero {
background: linear-gradient(135deg, #2b6cb0 0%, #4299e1 100%);
color: #fff;
text-align: center;
padding: 3.5rem 2rem 3rem;
border-radius: 0 0 2rem 2rem;
margin-bottom: 3rem;
}
.hero h1 { font-size: 2.4rem; font-weight: 800; margin-bottom: .6rem; }
.hero p { font-size: 1.1rem; opacity: .9; }
.badge {
display: inline-block;
background: rgba(255,255,255,.2);
border: 1px solid rgba(255,255,255,.4);
border-radius: 2rem;
padding: .3rem 1rem;
font-size: .85rem;
margin-bottom: 1.2rem;
}
/* ── 섹션 제목 ── */
.section-title {
font-size: 1.5rem;
font-weight: 700;
color: #2b6cb0;
margin: 2.5rem 0 1rem;
padding-bottom: .4rem;
border-bottom: 3px solid #bee3f8;
}
/* ── 설명 카드 ── */
.card {
background: #fff;
border-radius: 1rem;
padding: 1.5rem 1.8rem;
margin-bottom: 1.2rem;
box-shadow: 0 2px 8px rgba(0,0,0,.07);
border-left: 5px solid #4299e1;
}
.card h3 {
font-size: 1.1rem;
margin-bottom: .5rem;
color: #2d3748;
}
.card p { color: #4a5568; font-size: .97rem; }
/* ── 태그 뱃지 ── */
.tag-badge {
display: inline-block;
font-family: 'Courier New', monospace;
font-size: .85rem;
font-weight: 700;
background: #ebf8ff;
color: #2b6cb0;
border: 1px solid #bee3f8;
border-radius: .4rem;
padding: .15rem .55rem;
margin-right: .3rem;
white-space: nowrap;
}
/* ── 비교 박스 (non-semantic vs semantic) ── */
.compare-grid {
display: grid;
grid-template-columns: 1fr 1fr;
gap: 1.2rem;
margin: 1.2rem 0 2rem;
}
@media (max-width: 620px) { .compare-grid { grid-template-columns: 1fr; } }
.compare-box {
border-radius: .8rem;
padding: 1.2rem 1.4rem;
}
.compare-box.bad { background: #fff5f5; border: 2px solid #fc8181; }
.compare-box.good { background: #f0fff4; border: 2px solid #68d391; }
.compare-box .label {
font-weight: 700;
font-size: .85rem;
margin-bottom: .7rem;
display: flex;
align-items: center;
gap: .4rem;
}
.compare-box.bad .label { color: #c53030; }
.compare-box.good .label { color: #276749; }
.compare-box pre {
font-family: 'Courier New', monospace;
font-size: .82rem;
line-height: 1.8;
white-space: pre-wrap;
color: #2d3748;
}
/* ── 시각적 페이지 구조 다이어그램 ── */
.diagram {
background: #fff;
border-radius: 1rem;
padding: 2rem;
margin: 1.2rem 0 2rem;
box-shadow: 0 2px 8px rgba(0,0,0,.07);
font-family: 'Courier New', monospace;
font-size: .88rem;
}
.diagram .d-header {
background: #2b6cb0; color: #fff;
text-align: center; padding: .6rem 1rem;
border-radius: .4rem; margin-bottom: .5rem;
}
.diagram .d-nav {
background: #4299e1; color: #fff;
text-align: center; padding: .5rem 1rem;
border-radius: .4rem; margin-bottom: .5rem;
}
.diagram .d-middle {
display: flex; gap: .5rem; margin-bottom: .5rem;
}
.diagram .d-main {
background: #ebf8ff; color: #2b6cb0;
flex: 3; text-align: center; padding: 1.8rem .5rem;
border-radius: .4rem; border: 2px solid #90cdf4;
}
.diagram .d-aside {
background: #faf5ff; color: #6b46c1;
flex: 1; text-align: center; padding: 1.8rem .3rem;
border-radius: .4rem; border: 2px solid #d6bcfa;
font-size: .78rem;
}
.diagram .d-footer {
background: #718096; color: #fff;
text-align: center; padding: .6rem 1rem;
border-radius: .4rem;
}
.diagram .d-label { font-weight: 700; }
.diagram .d-desc { font-size: .78rem; opacity: .85; }
/* ── 태그 목록 테이블 ── */
.tag-table {
width: 100%;
border-collapse: collapse;
background: #fff;
border-radius: 1rem;
overflow: hidden;
box-shadow: 0 2px 8px rgba(0,0,0,.07);
margin-bottom: 2rem;
}
.tag-table thead th {
background: #2b6cb0;
color: #fff;
padding: .8rem 1rem;
text-align: left;
font-size: .9rem;
}
.tag-table tbody tr:nth-child(even) { background: #f7fafc; }
.tag-table tbody tr:hover { background: #ebf8ff; }
.tag-table td {
padding: .75rem 1rem;
border-bottom: 1px solid #e2e8f0;
font-size: .92rem;
vertical-align: top;
}
.tag-table td:first-child { width: 160px; }
/* ── 혜택 그리드 ── */
.benefit-grid {
display: grid;
grid-template-columns: repeat(auto-fit, minmax(200px, 1fr));
gap: 1rem;
margin: 1.2rem 0 2rem;
}
.benefit-card {
background: #fff;
border-radius: .8rem;
padding: 1.2rem 1.4rem;
text-align: center;
box-shadow: 0 2px 8px rgba(0,0,0,.07);
}
.benefit-card .icon { font-size: 2rem; margin-bottom: .5rem; }
.benefit-card h4 { font-size: .95rem; color: #2d3748; margin-bottom: .3rem; }
.benefit-card p { font-size: .82rem; color: #718096; }
/* ── 퀴즈 ── */
.quiz-box {
background: #fff;
border-radius: 1rem;
padding: 1.5rem 1.8rem;
margin-bottom: 1rem;
box-shadow: 0 2px 8px rgba(0,0,0,.07);
}
.quiz-box .q-num {
font-size: .8rem; font-weight: 700; color: #4299e1;
margin-bottom: .3rem;
}
.quiz-box .q-text {
font-weight: 600; margin-bottom: .8rem; color: #2d3748;
}
.quiz-options label {
display: block;
padding: .5rem .8rem;
border-radius: .4rem;
border: 1.5px solid #e2e8f0;
margin-bottom: .4rem;
cursor: pointer;
transition: background .15s, border-color .15s;
font-size: .93rem;
}
.quiz-options input[type="radio"] { margin-right: .5rem; accent-color: #4299e1; }
.quiz-options label:hover { background: #ebf8ff; border-color: #90cdf4; }
.quiz-options label.correct { background: #f0fff4; border-color: #68d391; color: #276749; }
.quiz-options label.wrong { background: #fff5f5; border-color: #fc8181; color: #c53030; }
.btn-check {
margin-top: 1rem;
background: #4299e1;
color: #fff;
border: none;
border-radius: .5rem;
padding: .55rem 1.4rem;
font-size: .95rem;
font-weight: 600;
cursor: pointer;
transition: background .2s;
}
.btn-check:hover { background: #2b6cb0; }
.quiz-feedback {
margin-top: .7rem;
font-size: .9rem;
font-weight: 600;
min-height: 1.2em;
}
/* ── 요약 체크리스트 ── */
.checklist {
list-style: none;
background: #fff;
border-radius: 1rem;
padding: 1.5rem 1.8rem;
box-shadow: 0 2px 8px rgba(0,0,0,.07);
margin-bottom: 2rem;
}
.checklist li {
padding: .45rem 0;
border-bottom: 1px solid #f0f4f8;
font-size: .97rem;
color: #2d3748;
}
.checklist li:last-child { border: none; }
.checklist li::before { content: '✅ '; }
/* ── 푸터 ── */
.footer {
text-align: center;
padding: 2rem 0 0;
font-size: .85rem;
color: #a0aec0;
}
</style>
</head>
<body>
<!-- ═══════════════════════ HERO ═══════════════════════ -->
<header>
<div class="hero">
<div class="badge">HTML5 기초</div>
<h1>HTML 시멘틱 태그</h1>
<p>의미 있는 마크업으로 더 좋은 웹을 만드세요</p>
</div>
</header>
<div class="page-wrapper">
<!-- ══ 1. 시멘틱이란? ══ -->
<h2 class="section-title">1. 시멘틱(Semantic)이란?</h2>
<div class="card">
<h3>단어의 뜻</h3>
<p>
<strong>Semantic</strong>은 <em>"의미론적인"</em>이라는 뜻입니다.<br>
<strong>시멘틱 태그</strong>란 <strong>태그 이름 자체가 콘텐츠의 의미를 설명</strong>하는 HTML 요소입니다.
</p>
</div>
<div class="card" style="border-left-color:#f6ad55;">
<h3>왜 필요할까요?</h3>
<p>
HTML은 <em>사람만 보는 것이 아닙니다.</em> 브라우저, 검색 엔진(Google), 스크린 리더(시각 장애인 보조 도구) 등
다양한 소프트웨어가 HTML을 읽습니다.<br><br>
<span class="tag-badge"><div></span> 나 <span class="tag-badge"><span></span> 만으로는
"이 부분이 메뉴인지, 기사 본문인지, 광고인지"를 알 수 없습니다.
시멘틱 태그를 쓰면 <strong>구조와 의미를 동시에</strong> 전달할 수 있습니다.
</p>
</div>
<!-- ══ 2. 비교 ══ -->
<h2 class="section-title">2. 시멘틱 vs 비시멘틱 비교</h2>
<div class="compare-grid">
<div class="compare-box bad">
<div class="label">⛔ 비시멘틱 (의미 없음)</div>
<pre><div id="header">
<div id="nav"> ... </div>
</div>
<div id="main">
<div class="article">
<div class="title">제목</div>
<div class="content"> ... </div>
</div>
</div>
<div id="footer"> ... </div></pre>
</div>
<div class="compare-box good">
<div class="label">✅ 시멘틱 (의미 있음)</div>
<pre><header>
<nav> ... </nav>
</header>
<main>
<article>
<h1>제목</h1>
<p> ... </p>
</article>
</main>
<footer> ... </footer></pre>
</div>
</div>
<!-- ══ 3. 페이지 구조 다이어그램 ══ -->
<h2 class="section-title">3. 페이지 구조 한눈에 보기</h2>
<div class="diagram">
<div class="d-header">
<span class="d-label"><header></span>
<span class="d-desc"> — 사이트 로고 · 제목 영역</span>
</div>
<div class="d-nav">
<span class="d-label"><nav></span>
<span class="d-desc"> — 주요 탐색 메뉴</span>
</div>
<div class="d-middle">
<div class="d-main">
<span class="d-label"><main></span><br>
<span class="d-desc">페이지의 핵심 콘텐츠</span><br><br>
<span style="background:#fff;border:1.5px solid #90cdf4;border-radius:.4rem;padding:.4rem .8rem;font-size:.8rem;color:#2b6cb0;">
<article> · <section> · <figure> …
</span>
</div>
<div class="d-aside">
<span class="d-label"><aside></span><br>
<span class="d-desc">사이드바<br>광고·관련글</span>
</div>
</div>
<div class="d-footer">
<span class="d-label"><footer></span>
<span class="d-desc"> — 저작권 · 연락처 · 링크</span>
</div>
</div>
<!-- ══ 4. 주요 태그 목록 ══ -->
<h2 class="section-title">4. 주요 시멘틱 태그 정리</h2>
<table class="tag-table">
<thead>
<tr>
<th>태그</th>
<th>의미</th>
<th>주요 사용 예</th>
</tr>
</thead>
<tbody>
<tr>
<td><span class="tag-badge"><header></span></td>
<td>페이지 또는 섹션의 <strong>머리말</strong></td>
<td>로고, 사이트 제목, 상단 내비게이션</td>
</tr>
<tr>
<td><span class="tag-badge"><nav></span></td>
<td>주요 <strong>탐색 링크</strong> 묶음</td>
<td>메인 메뉴, 사이드바 메뉴, 빵 부스러기(breadcrumb)</td>
</tr>
<tr>
<td><span class="tag-badge"><main></span></td>
<td>문서의 <strong>핵심 콘텐츠</strong></td>
<td>페이지당 단 1개, 반복되지 않는 고유 내용</td>
</tr>
<tr>
<td><span class="tag-badge"><article></span></td>
<td>독립적으로 배포·재사용 가능한 <strong>콘텐츠 단위</strong></td>
<td>블로그 글, 뉴스 기사, 댓글 하나</td>
</tr>
<tr>
<td><span class="tag-badge"><section></span></td>
<td>주제별로 묶인 <strong>콘텐츠 구획</strong></td>
<td>챕터, 탭 패널, 주제 묶음</td>
</tr>
<tr>
<td><span class="tag-badge"><aside></span></td>
<td>본문과 <strong>간접적으로 관련</strong>된 보조 내용</td>
<td>사이드바, 광고, 관련 글, 용어 설명</td>
</tr>
<tr>
<td><span class="tag-badge"><footer></span></td>
<td>페이지 또는 섹션의 <strong>꼬리말</strong></td>
<td>저작권, 연락처, 소셜 링크, 사이트맵</td>
</tr>
<tr>
<td><span class="tag-badge"><figure></span></td>
<td>그림·코드·표 등 <strong>독립된 미디어 콘텐츠</strong></td>
<td>이미지 + 캡션 묶음</td>
</tr>
<tr>
<td><span class="tag-badge"><figcaption></span></td>
<td><figure>의 <strong>캡션(설명)</strong></td>
<td>"그림 1. 지구의 구조"</td>
</tr>
<tr>
<td><span class="tag-badge"><time></span></td>
<td><strong>날짜·시간</strong>을 기계가 읽을 수 있게</td>
<td><code><time datetime="2025-03-01">3월 1일</time></code></td>
</tr>
<tr>
<td><span class="tag-badge"><mark></span></td>
<td>문맥 속에서 <strong>강조·하이라이트</strong>된 텍스트</td>
<td>검색 결과에서 키워드 표시</td>
</tr>
<tr>
<td><span class="tag-badge"><address></span></td>
<td>연락처·<strong>주소</strong> 정보</td>
<td>footer 안의 이메일·전화번호</td>
</tr>
</tbody>
</table>
<!-- ══ 5. article vs section ══ -->
<h2 class="section-title">5. article vs section, 어떻게 구분할까?</h2>
<div class="card" style="border-left-color:#68d391;">
<h3><article> — "이것만 떼어내도 의미가 통한다"</h3>
<p>
RSS 피드에 담아 다른 사이트에 올려도 내용을 이해할 수 있으면 <span class="tag-badge"><article></span> 입니다.<br>
<strong>예:</strong> 블로그 포스트, 유튜브 댓글 하나, 뉴스 기사
</p>
</div>
<div class="card" style="border-left-color:#f6ad55;">
<h3><section> — "같은 주제끼리 묶었다"</h3>
<p>
페이지 안에서 <em>논리적으로 관련된 내용을 그룹화</em>할 때 씁니다. 제목(<span class="tag-badge"><h2></span> 등)을 포함하는 것이 권장됩니다.<br>
<strong>예:</strong> "회사 소개" 섹션, "강의 목차" 섹션
</p>
</div>
<div class="card" style="border-left-color:#fc8181;">
<h3>❌ 단순 스타일 목적이면 <div>를 쓰세요</h3>
<p>
레이아웃을 위한 컨테이너처럼 <em>의미 없이 묶기만 할 때</em>는 <span class="tag-badge"><div></span>,
인라인 스타일 적용에는 <span class="tag-badge"><span></span>을 사용합니다.
의미 없이 시멘틱 태그를 남용하면 오히려 혼란을 줍니다.
</p>
</div>
<!-- ══ 6. 혜택 ══ -->
<h2 class="section-title">6. 시멘틱 태그를 쓰면 좋은 점</h2>
<div class="benefit-grid">
<div class="benefit-card">
<div class="icon">🔍</div>
<h4>SEO 향상</h4>
<p>검색 엔진이 콘텐츠 구조를 정확히 파악해 검색 순위가 올라갑니다.</p>
</div>
<div class="benefit-card">
<div class="icon">♿</div>
<h4>접근성 개선</h4>
<p>스크린 리더가 페이지를 올바르게 읽어 시각 장애인도 이용할 수 있습니다.</p>
</div>
<div class="benefit-card">
<div class="icon">👥</div>
<h4>코드 가독성</h4>
<p>팀원이 코드를 보면 바로 구조를 이해할 수 있어 협업이 쉬워집니다.</p>
</div>
<div class="benefit-card">
<div class="icon">🛠️</div>
<h4>유지보수 편의</h4>
<p>태그 이름만으로 역할을 알 수 있어 나중에 수정하기 쉽습니다.</p>
</div>
</div>
<!-- ══ 7. 실전 예시 ══ -->
<h2 class="section-title">7. 실전 예시 — 블로그 페이지</h2>
<div class="compare-box good" style="margin-bottom:2rem;">
<div class="label">✅ 시멘틱 태그를 활용한 블로그 구조</div>
<pre><body>
<header>
<h1>나의 개발 블로그</h1>
<nav>
<a href="/home">홈</a>
<a href="/posts">포스트</a>
<a href="/about">소개</a>
</nav>
</header>
<main>
<article>
<h2>시멘틱 HTML이란?</h2>
<time datetime="2025-05-11">2025년 5월 11일</time>
<p>오늘은 시멘틱 태그에 대해 알아봅니다...</p>
<figure>
<img src="diagram.png" alt="페이지 구조 다이어그램" />
<figcaption>그림 1. 시멘틱 태그 페이지 구조</figcaption>
</figure>
</article>
</main>
<aside>
<h3>관련 포스트</h3>
<ul> ... </ul>
</aside>
<footer>
<address>문의: [email protected]</address>
<p>&copy; 2025 나의 블로그</p>
</footer>
</body></pre>
</div>
<!-- ══ 8. 핵심 요약 ══ -->
<h2 class="section-title">8. 핵심 요약 체크리스트</h2>
<ul class="checklist">
<li>시멘틱 태그는 <strong>태그 이름 자체가 의미</strong>를 가집니다.</li>
<li>페이지 상단엔 <strong><header></strong>, 메뉴엔 <strong><nav></strong>를 사용합니다.</li>
<li>핵심 콘텐츠는 <strong><main></strong> 안에, 페이지당 하나만 씁니다.</li>
<li>독립적인 콘텐츠 단위는 <strong><article></strong>, 주제 묶음은 <strong><section></strong>.</li>
<li>보조 콘텐츠(사이드바·광고)는 <strong><aside></strong>에 넣습니다.</li>
<li>이미지와 캡션은 <strong><figure> + <figcaption></strong>으로 묶습니다.</li>
<li>의미 없이 묶을 때만 <strong><div> / <span></strong>을 씁니다.</li>
<li>시멘틱 태그는 <strong>SEO · 접근성 · 유지보수</strong> 모두에 도움이 됩니다.</li>
</ul>
<!-- ══ 9. 퀴즈 ══ -->
<h2 class="section-title">9. 확인 퀴즈</h2>
<!-- Q1 -->
<div class="quiz-box" id="q1-box">
<div class="q-num">Q1</div>
<div class="q-text">사이트 로고와 상단 메뉴를 담을 때 가장 적합한 태그는?</div>
<div class="quiz-options" id="q1-opts">
<label><input type="radio" name="q1" value="a"> <div id="header"></label>
<label><input type="radio" name="q1" value="b"> <header> + <nav></label>
<label><input type="radio" name="q1" value="c"> <section></label>
<label><input type="radio" name="q1" value="d"> <main></label>
</div>
<button class="btn-check" onclick="checkQuiz('q1','b','<header>는 머리말 영역, <nav>는 탐색 링크를 나타내는 가장 적합한 조합입니다.')">정답 확인</button>
<div class="quiz-feedback" id="q1-fb"></div>
</div>
<!-- Q2 -->
<div class="quiz-box" id="q2-box">
<div class="q-num">Q2</div>
<div class="q-text">블로그 포스트 하나를 마크업할 때 알맞은 태그는?</div>
<div class="quiz-options" id="q2-opts">
<label><input type="radio" name="q2" value="a"> <section></label>
<label><input type="radio" name="q2" value="b"> <aside></label>
<label><input type="radio" name="q2" value="c"> <article></label>
<label><input type="radio" name="q2" value="d"> <div class="post"></label>
</div>
<button class="btn-check" onclick="checkQuiz('q2','c','<article>은 독립적으로 배포·재사용 가능한 콘텐츠 단위에 사용합니다. 블로그 포스트는 그 대표적인 예입니다.')">정답 확인</button>
<div class="quiz-feedback" id="q2-fb"></div>
</div>
<!-- Q3 -->
<div class="quiz-box" id="q3-box">
<div class="q-num">Q3</div>
<div class="q-text">다음 중 시멘틱 태그가 <strong>아닌</strong> 것은?</div>
<div class="quiz-options" id="q3-opts">
<label><input type="radio" name="q3" value="a"> <footer></label>
<label><input type="radio" name="q3" value="b"> <mark></label>
<label><input type="radio" name="q3" value="c"> <span></label>
<label><input type="radio" name="q3" value="d"> <time></label>
</div>
<button class="btn-check" onclick="checkQuiz('q3','c','<span>은 인라인 요소를 스타일링하기 위한 컨테이너로, 의미를 담지 않는 비시멘틱 태그입니다.')">정답 확인</button>
<div class="quiz-feedback" id="q3-fb"></div>
</div>
<!-- Q4 -->
<div class="quiz-box" id="q4-box">
<div class="q-num">Q4</div>
<div class="q-text">이미지와 그 설명(캡션)을 함께 묶을 때 올바른 구조는?</div>
<div class="quiz-options" id="q4-opts">
<label><input type="radio" name="q4" value="a"> <div><img><p>설명</p></div></label>
<label><input type="radio" name="q4" value="b"> <figure><img><figcaption>설명</figcaption></figure></label>
<label><input type="radio" name="q4" value="c"> <section><img></section></label>
<label><input type="radio" name="q4" value="d"> <aside><img></aside></label>
</div>
<button class="btn-check" onclick="checkQuiz('q4','b','<figure>와 <figcaption>은 이미지·코드·표 등의 미디어와 그 설명을 함께 묶는 시멘틱 조합입니다.')">정답 확인</button>
<div class="quiz-feedback" id="q4-fb"></div>
</div>
</div><!-- /page-wrapper -->
<footer>
<div class="footer">
<p>HTML 시멘틱 태그 학습 자료 | HTML5 표준 기반</p>
<p style="margin-top:.3rem;">더 알아보기: <a href="https://developer.mozilla.org/ko/docs/Glossary/Semantics" target="_blank" rel="noopener" style="color:#4299e1;">MDN Web Docs — 시멘틱</a></p>
</div>
</footer>
<script>
function checkQuiz(id, correct, explanation) {
const opts = document.getElementById(id + '-opts');
const fb = document.getElementById(id + '-fb');
const selected = opts.querySelector('input[name="' + id + '"]:checked');
if (!selected) {
fb.style.color = '#718096';
fb.textContent = '답을 선택해 주세요.';
return;
}
opts.querySelectorAll('label').forEach(label => {
label.classList.remove('correct', 'wrong');
const input = label.querySelector('input');
if (input.value === correct) {
label.classList.add('correct');
} else if (input.value === selected.value && selected.value !== correct) {
label.classList.add('wrong');
}
input.disabled = true;
});
if (selected.value === correct) {
fb.style.color = '#276749';
fb.innerHTML = '🎉 정답입니다! — ' + explanation;
} else {
fb.style.color = '#c53030';
fb.innerHTML = '❌ 오답입니다. — ' + explanation;
}
}
</script>
</body>
</html>
결과와 배운 점
학생들이 시멘틱을 조금 더 잘 이해할 수 있고, 강의 자료를 수시로 제공해 공부할 수 있도록 해서 그런지 중간 강의 평가가 좋았습니다.

필요한 AI 정보만
메일함에 쏙쏙 넣어드려요.
지금 핫한 AI 소식부터 직접 해 본 사례까지, 월요일마다 무료로 받아보세요